New for Fall 2026: E-Scooter Registration
E-scooter registration is required for all e-scooter riders.
Program Overview
With more electric scooters on campus, theft, injuries and speed-related incidents have increased. To help promote the safe, responsible and sustainable use of e-scooters, all users must complete several steps before they are permitted to operate or park an e-scooter on campus.
Get Educated. Get Safe. Get Registered.
To park or ride your e-scooter on campus, follow the steps below to complete your required safety training and obtain your registration.
Step 1: Complete the Mandatory Safety Training
Follow the Electric Micromobility Safety Tutorial and complete the required quiz.
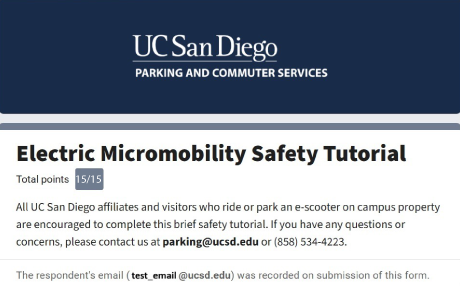
You must score 13 out of 15 questions or higher to pass. At the end of the tutorial, follow the instructions to document your completion and take a screenshot of your passing score.
You will be asked to upload your proof of completion when processing your e-scooter registration. Ensure that your email address is visible in the screenshot. See the sample screenshot below.
Step 2: Complete the Helmet Selfie Requirement
While wearing a helmet is not required to ride an e-scooter, UC San Diego strongly encourages all e-scooter riders to wear a helmet. It is one of the most important steps you can take to protect yourself while riding.
As part of the registration process, you must own a helmet and provide a “helmet selfie” showing you wearing it.
If you need a helmet, you can purchase one for just $10 through the Helmet Access Program.
Step 3: Select E-Scooter Registration ($0)
- Visit the Parking Portal.
- Login using your UC San Diego Single Sign-On (SSO).
- Navigate to “Order Items.”
- Select “Other.”
- Select “E-Scooter Registration – $0.”
Step 4: Upload the Required Documents
You will need to upload the following:
- Helmet selfie: A photo of yourself wearing a helmet.
- E-scooter photo: A clear photo of your e-scooter.
- Safety training verification: A screenshot showing your completed Micromobility Safety Tutorial quiz score.
Step 5: Enter Your E-Scooter Information
Enter this information about your e-scooter:
- E-scooter manufacturer
- E-scooter model
- E-scooter serial number
- E-scooter color
Then:
- Check the box to agree to the terms and conditions.
- Click “Add Permit to Cart.”
- Select “Permit – E-Scooter Registration $0.”
- Click “Check Out.”
Step 6: Wait for Registration Approval
Once you complete the application, your e-scooter registration transaction will be pending approval.
- If approved: You will receive an email with instructions on where and when to pick up your registration.
- If denied: A customer service representative will notify you of what information or documentation is missing and provide instructions on how to correct your application.
Compliance and Enforcement
Our goal is to help e-scooter riders complete the registration process before enforcement action is necessary.
Parking enforcement staff will monitor e-scooter parking areas and may place a warning tag on e-scooters that are not registered. The warning will include instructions for completing registration and provide seven days to register your e-scooter.
If an e-scooter remains unregistered after the warning period:
- The e-scooter may be immobilized until registration is completed.
- E-scooters that continue to remain unregistered may be impounded.
- Impounded e-scooters may be subject to a $25 lock-cut fee and daily storage fees.
- To retrieve an impounded e-scooter, you will need to provide proof of ownership, complete the registration process and pay any applicable fees.
We encourage riders to register early to avoid warnings, immobilization or impound fees.